Anyone that has done outbound marketing knows that having the right leads is absolutely imperative. You can spend a lot of time and effort reaching out to people, but if they don’t need your product, that is wasted time and effort. Proper research to find qualified buyers up front is an important first step. An excellent option to find companies that need your services is to see who is hiring in your space. For example, if you are selling call center software it would be great to find out who is hiring call center representatives.
Glassdoor is a great website to research potential clients in this way. It includes a diverse group of data for businesses from all different fields, like salary information, company reviews, and interview questions. In this article, we will leverage the power of Node.js and a free automation service like Browserless to create a script that extracts various data regarding companies listed on Glassdoor based on a user-provided search.

We're constantly sharing different web scraping tactics
Glassdoor scraper step #1 - Get a Browsereless API Key
Browserless is a headless automation platform that provides fast, scalable, and reliable web browser automation, ideal for data extraction tasks. It’s an open-source platform with more than 7.2K stars on GitHub. Some of the largest companies worldwide use the platform daily to conduct QA testing and data collection tasks.
To get started, we first have to create an account.
The platform offers free accounts, and paid plans if we need more powerful processing power. The free tier offers up to 6 hours of usage, which is more than enough for our case.
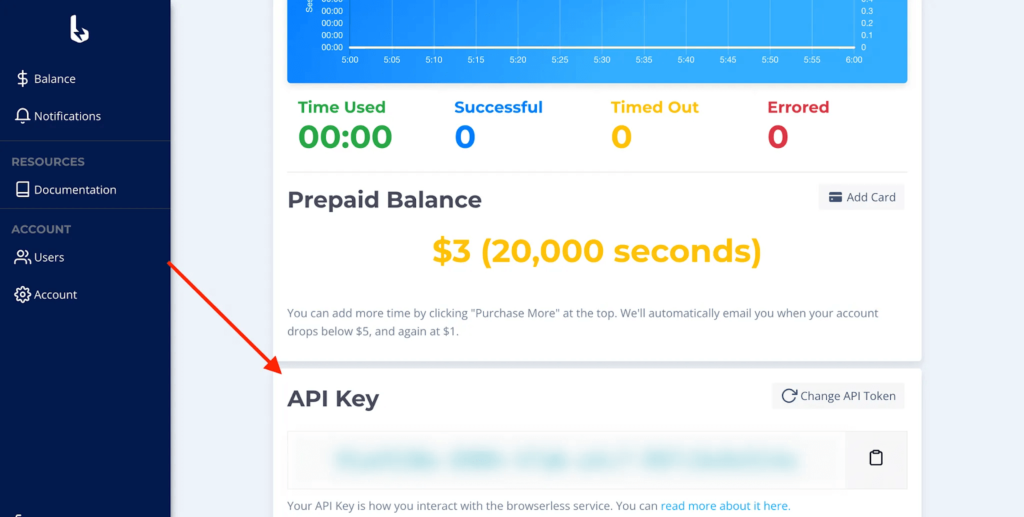
After completing the registration process, the platform supplies us with an API key. We will use this key to access the Browserless services later on.
Glassdoor scraper step #2 - Initialize a Node script and connect to Browserless
Now that we have gained access to the Browserless platform, we can begin structuring our script. To do that, we will use one of the most popular scraping workflows in Javascript: Node.js with puppeteer. This incredible, well-maintained, robust, and feature-proof library can emulate real user interactions with the browser.
First, we should initialize a new Node project and install the puppeteer-core package.
The puppeteer-core package provides all the functionalities of the main puppeteer package without downloading the browser, resulting in reduced dependency artifacts.
We've already shared different web automation use cases that you can easily implement with puppeteer-core.
Once we have installed our module, we can create the script's structure.
There are a couple of things to point out here, so let's break down the above snippet:
- First, we import the
puppeteer-coremodule. - Wes should declare a variable
BROWSERLESS_API_KEY, whose value is the Browserless API key we retrieved from the dashboard earlier. - We'll declare the variables
GLASSDOOR_USERNAMEandGLASSDOOR_PASSWORD, whose value contains our Glassdoor profile sign-in information. - We declare our primary function
getGlassdoorData, which accepts the search keywords and the companies’ location as parameters, e.g., “software development” and “London”. - We call
getGlassdoorDataand print the results to the terminal. Note that we use top-level await syntax, supported by ESM from Node version 14 and afterward.
Inside the getGlassdoorData function, we connect to the Browserless service by calling the connect method of the puppeteer module and use the browserWSEndpoint property to indicate the connection URI, which consists of two parts:
- The base URI
wss://chrome.browserless.io - The
tokenquery-string parameter, which value is the API key we retrieved from the dashboard.
Then we instantiate a new browser page and navigate to the login route of the web app. Take a note to setViewport call. The Glassdoor interface is mobile-friendly, and the viewport size affects its UI, which can alter the rendered components. To prevent issues such as undefined document selectors, we set the page's viewport to a constant value equal to a standard desktop definition, i.e., 1920x1080.
Glassdoor scraper step #3 - Sign-in to Glassdoor
Now that we have an active browser connection, we can log in to Glassdoor. Our task consists of three steps:
- Locate the username input field and fill it with the value of
GLASSDOOR_USERNAME. - Locate the password input field and fill it with the value of
GLASSDOOR_PASSWORD. - Press the corresponding sign-in button.
We can quickly locate the above DOM elements using the Inspector Tool.
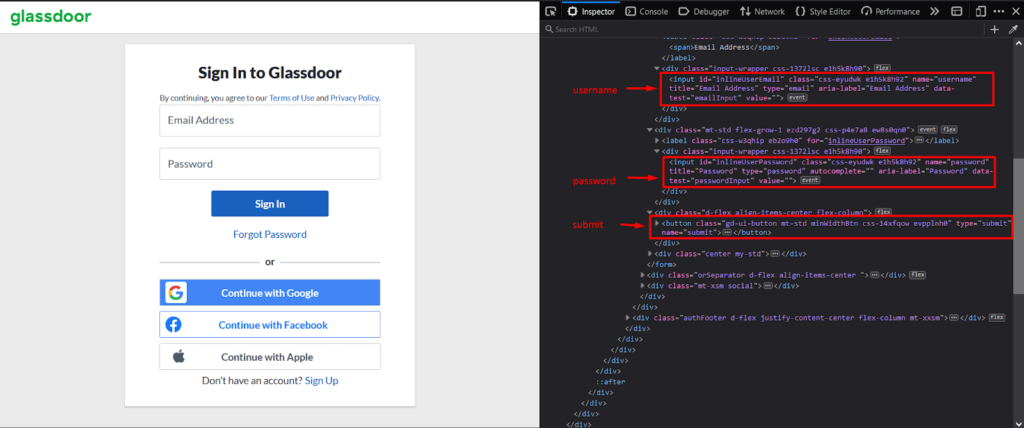
Fortunately, the corresponding username and password <input/> elements define a data-test attribute, simplifying the query selector.
After submitting the form, we call the waitForNavigation method to block the control flow until the sign-in process is completed.
Glassdoor scraper step #4 - Get company search results
After gaining access to our account dashboard, we can move to the next step: searching for the desired companies.
We will approach the task the same way as before:
- Locate the keywords input field and fill it with the value of
searchKeywordsparameter. - Locate the location input field and fill it with the value of the
searchLocationparameter. - Press the corresponding search button.
We will rely again on the Inspector Tool to locate the appropriate DOM elements.
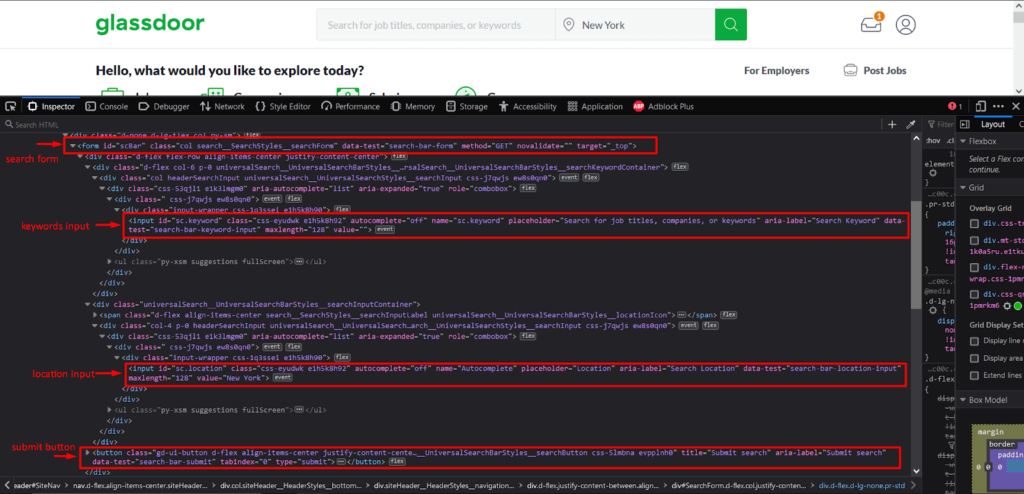
Glassdoor pre-defines a value for the location input based on our profile data, so we first need to delete the preexisting. To achieve that, we call the click method on the location input three times to select all the text. Then we overwrite it and “hit” the search button.
The resulting page contains various information about the available jobs, salaries, and companies that match the search criteria. We are only interested in the companies section, but we must follow the “See all companies” link to get a complete list of the matched companies.
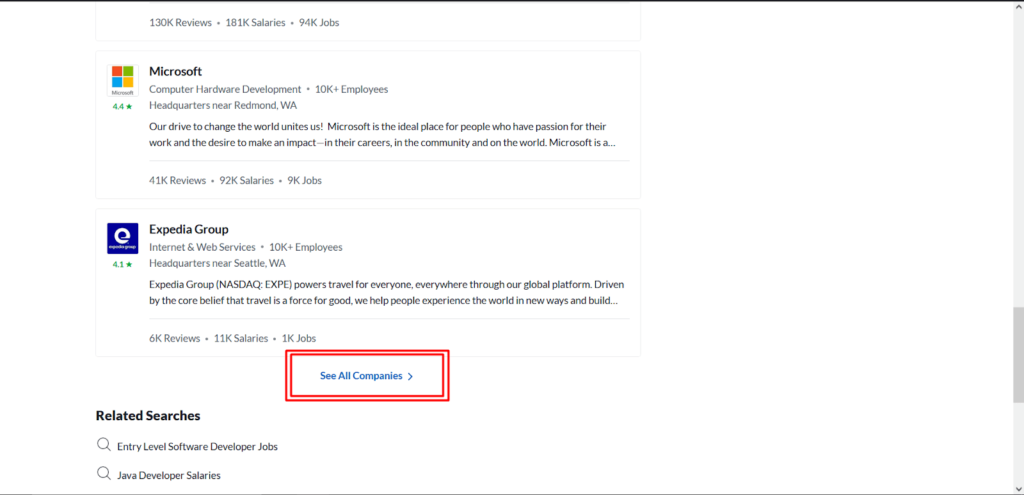
The above snippet locates the desired link, which will always be the last one returned by the querySelectorAll method.
> Note: The “See all companies” link might not be present in some search results, which is not the case for popular search queries. However, if we want to prevent informed access to an empty array, we should add a condition to test the presence of the link accordingly.
Glassdoor scraper step #5 - Extract companies' data
We have successfully managed to list all the available companies for the provided searched criteria. We can now extract all the valuable details for each one, such as its name, user rating, location, size, operating industry, etc.
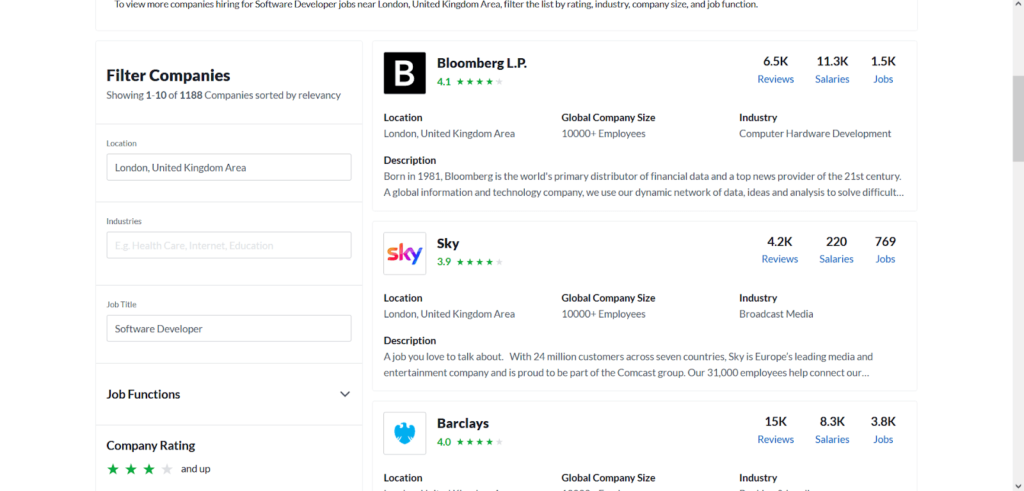
To increase the code’s readability, we will define a function getCompaniesInfo that will query all the available companies and extract the corresponding data.
Executing the Glassdoor scraping script
Combining all the previous snippets, we get the complete script.
Running the above, we get an output similar to the below:
Epilogue
In this article, we saw how we could use an automation platform like Browserless with Node.js to gather valuable data about various companies listed on the Glassdoor website. We hope we taught something great today. Be sure to follow us on social media for more educational content.
If you like our content, you can check out how our clients use Browserless for different use cases:
- @IrishEnergyBot used web scraping to help create awareness around Green Energy
- Dropdeck automated slide deck exporting to PDF and generation of PNG thumbnails
- BigBlueButton, an open-source project, runs automated E2E tests with Browserless
__
George Gkasdrogkas,
