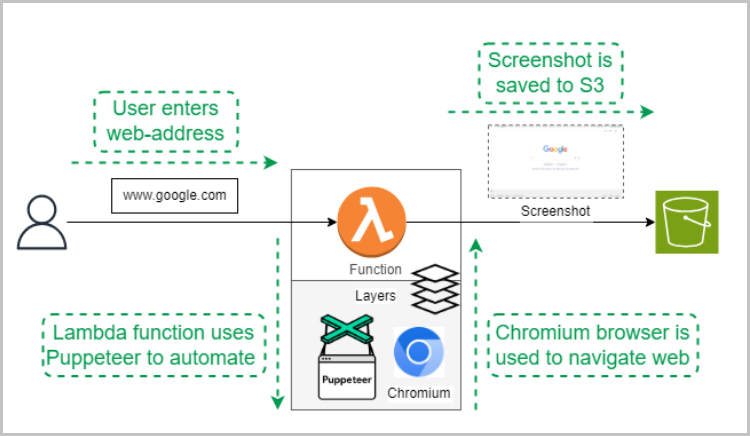
In this article we'll look at creating a zip file, Lambda function and layers in S3 to deploy Puppeteer on AWS Lambda.
This includes why you should use puppeteer-core with a package such as chrome-aws-lamda, and how to deploy them.
The guide includes details for either connecting Puppeteer to an existing browser pool, or for hosting them yourself,
How to Use AWS Lambda and Puppeteer for Browser Automation
AWS Lambda can be combined with browser automation tools like Puppeteer, to become a powerful platform for executing tasks in the cloud. This combination allows users to control Chrome/Chromium through the Chrome DevTools Protocol (CDP), enabling automated UI testing, web scraping, and performance monitoring efficiently and at scale.

To enable this, we'll create a Lambda function that takes a website URL as input as an example. Using puppeteer-core and a Chrome browser, the function will visit the provided website, capture a screenshot, and save it to an S3 bucket. This will allow us to check if our web automation works.
{{banner}}
The DIY Option: Setting up Puppeteer on AWS Lambda
Creating a zip library file for chrome-aws-lambda
Lambda's file size restrictions don't play nicely with Chrome. The default Puppeteer package with it's bundled version of Chrome won't work.
Instead, you'll need to use puppeteer-core which only includes the library, with a compressed version of Chrome. This version of chrome can then be uncompressed each time your Lambda runs.
Packages such as the ones by sparticuz or alixaxel exist to make Chrome compatible with Lambda, along with our own open source Chrome container.
NOTE: The chrome-aws-lambda packages by sparticuz and alixaxel are no longer maintained, but we'll use one in this example to keep things simple.
To incorporate Puppeteer into our AWS Lambda function, we'll utilize the chrome-aws-lambda package, available on chrome-aws-lambda - npm. It contains all the necessary modules required including Puppeteer-core and Chrome browser. Lambda uses Puppeteer to launch the browser and navigate to the given website.
This package will be added to the lambda function in the form zipped library. This zip file of the library can be created on any platform like local machines or EC2. It involves downloading the library from a given website and packing it into a zip file. Following the code block on the npm website provides the easiest way to create this zip file on Linux machines.
These commands will download the required libraries and create a zip file chrome_aws_lambda.zip. Once the zip file is created, upload it to the S3 bucket to easily add it to the lambda layer and store it for future use.
Writing a Lambda Function
A Lambda function can be created using the AWS console with nodejs runtime. At least 512 MB RAM should be allocated for a function as recommended by the npm package. Also, increase the default lambda timeout of 3 sec to 5 minutes or more. Chrome browsers takes time to get started and navigate to the website similar to the way it works when done manually.
The code for this is:
Package descriptions also need to be added along with the index.js file which lists the dependencies. It is usually added as a package.json. This file is created with each layer when libraries are installed in EC2.
A file with these dependencies would be:
Adding layers to AWS Lambda
The process of creating layers and copying them to S3 is described above. Adding layer tabs on Lambda AWS console provides an intuitive way to add a layer using zip files already present in S3.
For more information, check out these links:
Creating and deleting layers in Lambda
Adding layers to functions - AWS Lambda
Triggering and testing the code -
Code can be triggered using the test button with the website name as input. Our code uses google.com as default if no input is provided. On a successful run, the screenshot of the website is stored in S3 in the given bucket.
Further considerations
There are a variety of challenges to keep Puppeteer and Chrome running smoothly in the cloud. These include:
- Lazy loading fonts to get around Lambda's file size limits
- Balancing the pros and cons of cold starts vs keeping lambda warm
- Minimizing ingress and egress with network-interception
- Fixing breakages due to Chrome version updates
- Building a pipeline with unit-tests and visual-diff tests
That's why maintaining Chrome deployments typically requires one of two full-time dedicated engineers. We go into these in more detail in this article:
Advanced issues when managing Chrome on AWS
Want to skip all this hassle? Use our pool of managed browsers
If you don't want to have to sink time into wrestling with Chrome, then check out Browserless. Our pool of headless browsers are ready to connect to directly with Playwright, Puppeteer or our REST API.
Check out the options for yourself and grab a free account.
The Easy Option: Deploy puppeteer-core on AWS and Let Browserless Host Chrome
Puppeteer is simple to deploy, it’s Chrome that causes difficulties. Browsers aren’t designed to run in the cloud, with frequently updating dependencies, excessive memory leaks and poor file management.
For a simpler path, use Browserless.
We host a pool of managed browsers, ready to connect to with a change in endpoint via puppeteer.connect(). The rest of your code then stays the same.
For more details on using Puppeteer with Browserless, take a look at our docs. We also have REST APIs for common tasks such as extracting HTML, exporting PDFs and downloading files.
