eBay is one of the biggest e-commerce platforms, with over a billion product listings. Whether you’re looking to analyze competitors, track market trends, or gain deeper insights into what customers want, the data on eBay is incredibly valuable. You can extract details like product titles, prices, seller info, and even shipping costs to help with your research.
That said, scraping eBay isn’t always straightforward, especially on a large scale. In this article you will learn how to scrape eBay by using Puppeteer, Playwright, and also BQL, which solves bot detection issues.
eBay’s Page Structure
When scraping eBay, understanding the structure of its pages is essential to gather relevant data efficiently. Each type of page on eBay serves a specific purpose and offers unique data points.
Let’s break it down:
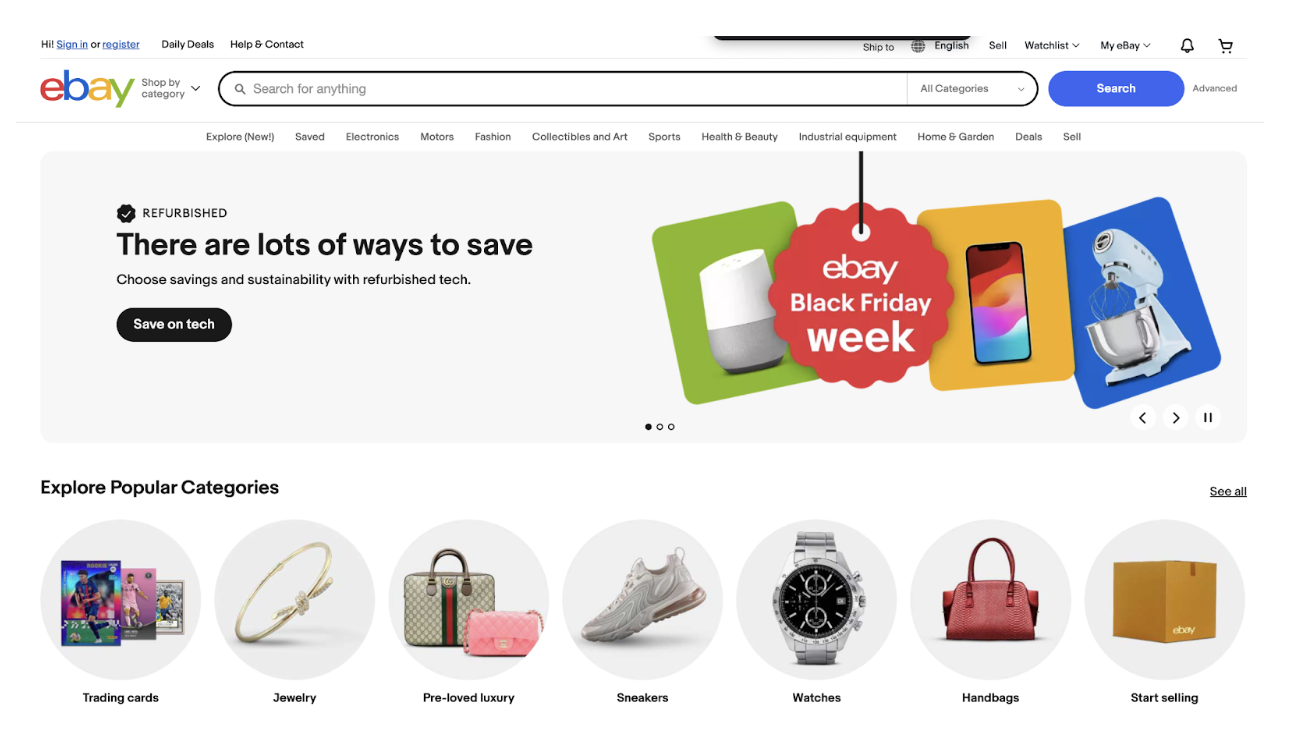
The eBay home page is the gateway to the platform. It’s designed to provide quick access to popular categories, trending deals, and personalized recommendations.
Key data you can extract from the home page includes:
- Popular Categories: These categories, often displayed as clickable links or buttons, provide insights into the most frequently browsed sections (e.g., Electronics, Fashion, Home & Garden).
- Featured Products: Special offers and highlighted products, which can indicate seasonal or trending items.
- Promotional Banners: Details on current sales and promotions, such as Black Friday discounts.
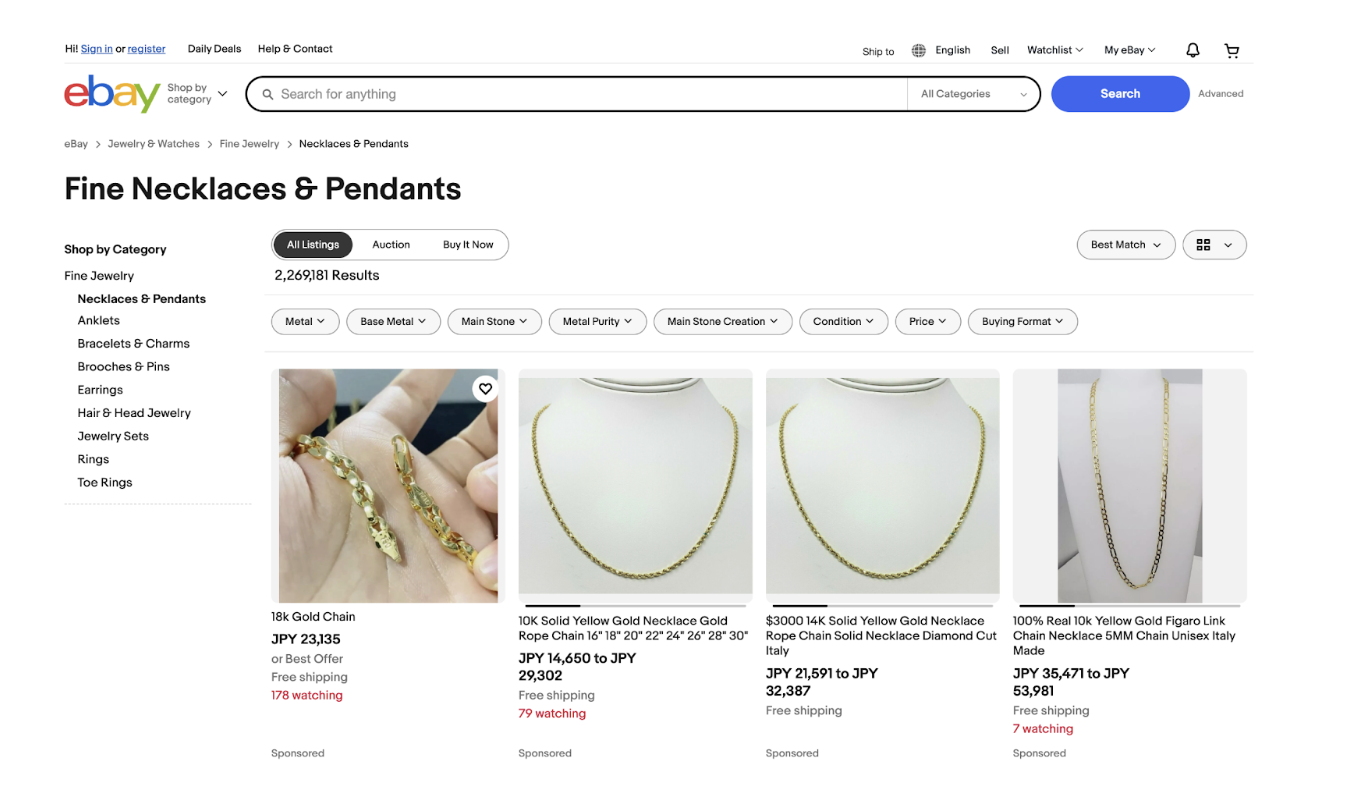
The product listing page showcases a list of items that match a search query or category. This is where you can gather a wide range of product data in bulk.
The main data points include:
- Product Titles: Clearly displayed under each item, these are useful for identifying and categorizing products.
- Prices: Shown alongside each product, these provide pricing insights, including discounts or offers.
- Product Images: Thumbnail images that give a quick visual of the item.
- Seller Information: Sometimes, seller ratings or names are displayed, showing the seller’s reliability.
- Shipping Details: Indicators like “Free Shipping” or estimated delivery dates can be extracted for logistics analysis.
This page is ideal for large-scale web scraping, as it consolidates many listings in one place.
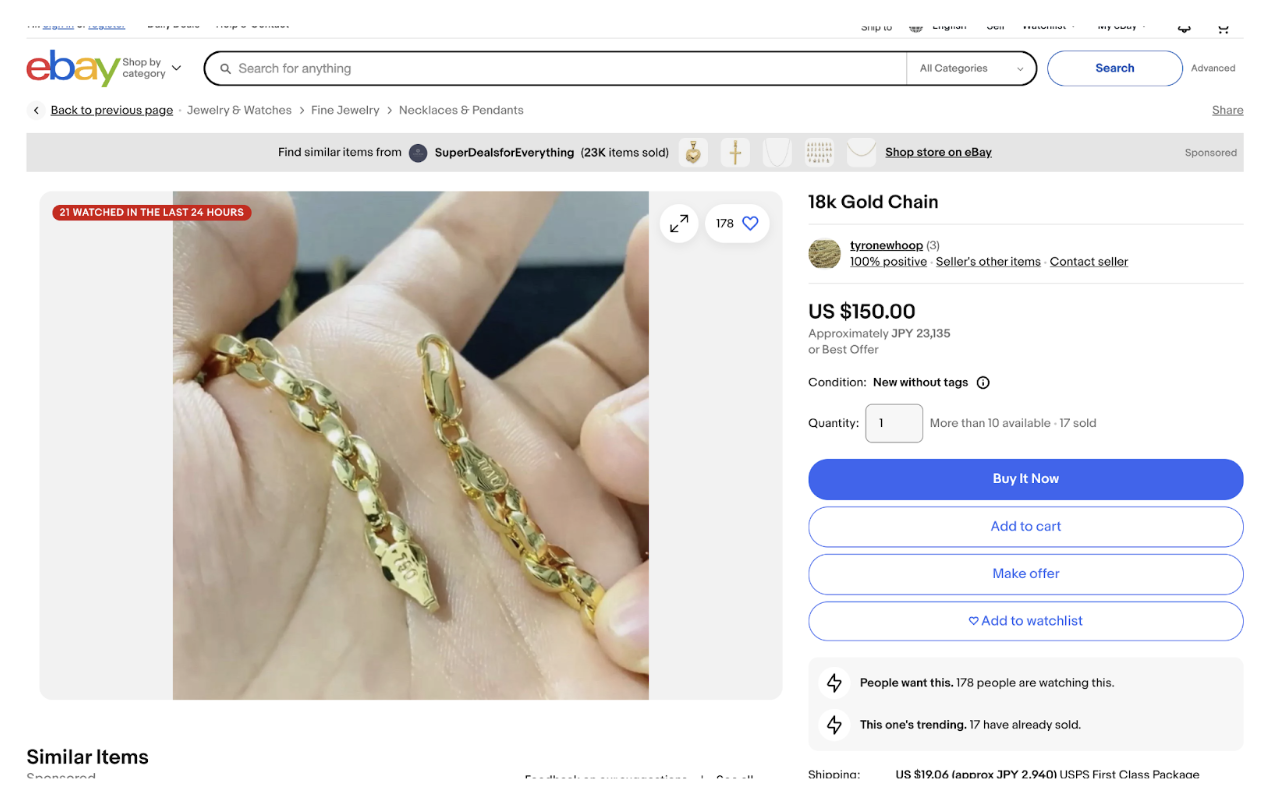
The product detail page provides an in-depth view of a specific item. It’s rich with data that’s critical for detailed analysis.
Key data points to scrape include:
- Product Description: A detailed item overview, including features and specifications.
- Price and Discounts: Comprehensive pricing information, including any promotional pricing.
- Seller Details: Information about the seller, including ratings, feedback, and other items they sell.
- Shipping Options: Precise details on shipping costs, locations, and delivery estimates.
- Customer Reviews: If available, reviews and ratings offer direct feedback on the product’s quality and usability.
- Condition: Whether the item is new, used, or refurbished, it is typically displayed prominently.
This page is especially useful for gathering detailed product specifications and understanding customer feedback.
Create an eBay Web Scraper with Puppeteer
If you want to pull down a few records from eBay, Puppeteer is a great place to start. It’s straightforward to set up, and you can get a script running quickly to automate basic tasks like searching for products and extracting data.
Let’s walk through the steps to get started.
Step 1: Launching Puppeteer and Navigating to eBay website
To begin with, we use Puppeteer to open a browser in headless mode and navigate to eBay’s homepage. This step sets up the foundation for automating interactions with the website.
const browser = await puppeteer.launch({ headless: true });
const page = await browser.newPage();

console.log("Navigating to eBay...");
await page.goto("https://www.ebay.com", { waitUntil: "domcontentloaded" });
What’s Happening?
- Launching the browser: Puppeteer starts a headless browser (no graphical interface) to save resources and work behind the scenes.
- Opening a new page: We create a fresh browser tab where all actions occur.
- Navigating to eBay: The
goto()function directs the browser to eBay and waits until the page’s main content has loaded.
Step 2: Searching for “iPhone”
Next, we tell Puppeteer to search for "iPhone" on eBay by interacting with the search bar and button. This mimics what a user would do manually.
const searchInputSelector = "#gh-ac";
const searchButtonSelector = "#gh-search-btn";

console.log("Entering search term and submitting...");
await page.type(searchInputSelector, "iPhone", { delay: 100 });
await page.click(searchButtonSelector);
What’s Happening?
- Selecting elements: We use CSS selectors to pinpoint the search input field (
#gh-ac) and button (#gh-search-btn). - Typing the search term: The
type()method enters "iPhone" into the search bar, with a slight delay to mimic natural typing. - Submitting the search: The
click()method clicks the search button to perform the query.
Step 3: Waiting for the Results to Load
Patience pays off! After submitting the search, we need to ensure the results page is fully loaded before extracting data.
const resultsContainerSelector = ".srp-results.srp-list.clearfix";

console.log("Waiting for the results to load...");
await page.waitForSelector(resultsContainerSelector, { timeout: 15000 });
What’s Happening?
- Waiting for elements: The
waitForSelector()method pauses the script until the results container is visible. - Timeout protection: A 15-second timeout ensures the script doesn’t hang indefinitely if the page takes too long to load.
- Ensuring readiness: This step guarantees the page is fully loaded before we proceed to scraping eBay.
Step 4: Scrape eBay listings for data
Now for the fun part—pulling the product data! We loop through all the search results and gather relevant details like titles, prices, and shipping information.
const productSelector = "li.s-item";

console.log("Extracting product data...");
const productData = await page.$$eval(
  productSelector,
  (products) =>
    products
      .map((product) => {
        const titleElement = product.querySelector(".s-item__title");
        const priceElement = product.querySelector(".s-item__price");
        const shippingElement = product.querySelector(".s-item__shipping");
        const sellerElement = product.querySelector(".s-item__seller-info");
        const locationElement = product.querySelector(".s-item__itemLocation");
        const soldElement = product.querySelector(".s-item__quantitySold");

        const title = titleElement ? titleElement.textContent.trim() : "N/A";
        const price = priceElement ? priceElement.textContent.trim() : "N/A";
        const shipping = shippingElement
          ? shippingElement.textContent.trim()
          : "N/A";
        const seller = sellerElement ? sellerElement.textContent.trim() : "N/A";
        const location = locationElement
          ? locationElement.textContent.trim()
          : "N/A";
        const sold = soldElement ? soldElement.textContent.trim() : "N/A";

        return { title, price, shipping, seller, location, sold };
      })
      .filter((product) => product.title), // Exclude items without titles
);
What’s Happening?
- Selecting product elements: We target all search result items using the
li.s-itemselector. - Extracting details: Inside each item, we look for specific child elements (like title, price, etc.) and collect their text content.
- Handling missing data: If any detail is unavailable, we return "N/A" to avoid errors.
- Filtering results: We filter out items without titles to keep the data clean.
Step 5: Saving Data to a CSV
To preserve the scraped data, we convert it into CSV format and save it as a file. This makes the information easy to analyze later.
const csv = parse(productData, {
  fields: ["title", "price", "shipping", "seller", "location", "sold"],
});
const filePath = path.join(__dirname, "ebay_products.csv");

fs.writeFileSync(filePath, csv, "utf8");
console.log(`Product data saved to ${filePath}`);
What’s Happening?
- Formatting data: The
json2csvlibrary converts our product data array into a CSV format with headers. - Defining the file path: We specify where to save the CSV file (
ebay_products.csvin the current directory). - Writing the file: The
writeFileSync()method saves the CSV file locally for future use.
Step 6: Closing the Browser
Finally, we clean up by closing the Puppeteer browser to free up resources.
await browser.close();
console.log("Browser closed.");
What’s Happening?
- Closing the session: The
close()method shuts down the browser instance we started earlier. - Freeing resources: This step ensures no processes are left running in the background.
With this approach, you’ve built a great starting point for web scraping eBay and gathering product data. However, as you expand to include features like pagination or navigate challenges such as website structure changes, this method can become more time-intensive and require significant tweaking. If you don't want to struggle with the obstacles that come with scaling up, you might want to read our docs on Connecting to Puppeteer, so you can switch from using the .launch() mehtod to using the .connect() method and use our browsers infrastructure in the cloud.
Scaling up can also bring issues like anti-bot detection into play, adding complexity to your script. That’s why tools that streamline these tasks are so valuable they take care of the technical overhead, letting you focus on extracting the data you need without getting bogged down in constant adjustments.
Write an eBay Web Scraper with Python
We'll now walk through how to scrape eBay product data using Python and Playwright. This approach offers a powerful, modern way to automate web interactions and extract valuable product information.
Step 1: Setting Up the Environment and Launching Playwright
We start by importing the necessary libraries and setting up our Playwright browser instance. This creates the foundation for our web automation.
import asyncio
import csv
import os
from playwright.async_api import async_playwright
import sys


async def scrape_ebay_products():
    """Main function to scrape eBay products using Playwright."""
    async with async_playwright() as p:
        browser = None

        try:
            print("Launching browser...")
            browser = await p.chromium.launch(headless=True)
            page = await browser.new_page()

            print("Navigating to eBay...")
            await page.goto("https://www.ebay.com", wait_until="domcontentloaded")
What's Happening?
-
Importing libraries: We import asyncio for asynchronous operations, csv for data export, os for file path handling, and playwright.async_api for browser automation.
-
Launching the browser: Playwright starts a headless Chromium browser to work efficiently in the background.
-
Creating a new page: We open a fresh browser tab where all our interactions will take place.
-
Navigating to eBay: The goto() method directs the browser to eBay and waits until the page's main content has loaded.
Step 2: Defining Selectors and Searching for "iPhone"
Next, we define the CSS selectors we'll need and perform a search for "iPhone" products on eBay.
# Define selectors
search_input_selector = "#gh-ac"
search_button_selector = "#gh-search-btn"

print("Entering search term and submitting...")
await page.fill(search_input_selector, "iPhone")
await page.click(search_button_selector)
What's Happening?
-
Selecting elements: We use CSS selectors to identify the search input field (#gh-ac) and search button (#gh-search-btn).
-
Filling the search field: The fill() method enters "iPhone" into the search bar, replacing any existing content.
-
Submitting the search: The click() method clicks the search button to execute the query.
Step 3: Waiting for the Results to Load
After submitting the search, we need to ensure the results page is fully loaded before we start extracting data.
results_container_selector = ".srp-results.srp-list.clearfix"
print("Waiting for the results to load...")
await page.wait_for_selector(results_container_selector, timeout=15000)

# Give extra time for all products to load
await page.wait_for_timeout(3000)
What's Happening?
-
Waiting for elements: The wait_for_selector() method pauses the script until the results container is visible on the page.
-
Timeout protection: A 15-second timeout ensures the script doesn't hang indefinitely if the page takes too long to load.
-
Additional wait time: We add an extra 3-second delay to ensure all dynamic content has loaded completely.
Step 4: Extracting Product Details
Now for the core functionality, extracting product data from all search results using JavaScript evaluation.
product_selector = "li.s-item"

print("Extracting product data...")
product_data = await page.eval_on_selector_all(product_selector, """
    (products) => {
        return products.map((product) => {
            const titleElement = product.querySelector('.s-item__title');
            const priceElement = product.querySelector('.s-item__price');
            const shippingElement = product.querySelector('.s-item__shipping');
            const sellerElement = product.querySelector('.s-item__seller-info');
            const locationElement = product.querySelector('.s-item__itemLocation');
            const soldElement = product.querySelector('.s-item__quantitySold');

            const title = titleElement ? titleElement.textContent.trim() : 'N/A';
            const price = priceElement ? priceElement.textContent.trim() : 'N/A';
            const shipping = shippingElement ? shippingElement.textContent.trim() : 'N/A';
            const seller = sellerElement ? sellerElement.textContent.trim() : 'N/A';
            const location = locationElement ? locationElement.textContent.trim() : 'N/A';
            const sold = soldElement ? soldElement.textContent.trim() : 'N/A';

            return { title, price, shipping, seller, location, sold };
        }).filter((product) => product.title && product.title !== 'N/A');
    }
""")
What's Happening?
-
Selecting product elements: We target all search result items using the li.s-item selector.
-
JavaScript evaluation: The eval_on_selector_all() method runs JavaScript code in the browser context to extract data from each product element.
-
Extracting details: For each product, we look for specific child elements (title, price, shipping, etc.) and collect their text content.
-
Handling missing data: If any detail is unavailable, we return "N/A" to avoid errors.
-
Filtering results: We filter out items without titles or with "N/A" titles to keep the data clean.
Step 5: Saving Data to a CSV File
To preserve the scraped data, we convert it into CSV format and save it as a file for later analysis.
file_path = os.path.join(os.path.dirname(__file__), "ebay_products.csv")

with open(file_path, 'w', newline='', encoding='utf-8') as csvfile:
    fieldnames = ['title', 'price', 'shipping', 'seller', 'location', 'sold']
    writer = csv.DictWriter(csvfile, fieldnames=fieldnames)

    writer.writeheader()
    for product in product_data:
        writer.writerow(product)

print(f"Product data saved to {file_path}")
print(f"Total products scraped: {len(product_data)}")
What's Happening?
-
Defining the file path: We specify where to save the CSV file (ebay_products.csv in the same directory as the script).
-
Creating CSV writer: We set up a DictWriter with the appropriate field names for our product data.
-
Writing headers: The writeheader() method adds column names to the CSV file.
-
Writing data: We iterate through each product and write it as a row in the CSV file.
-
Providing feedback: We print the file location and total number of products scraped.
Step 6: Error Handling and Cleanup
Finally, we implement proper error handling and clean up by closing the browser to free up resources.
try:
    # ... all the scraping code ...
except Exception as e:
    print(f"An error occurred: {e}")
finally:
    if browser:
        await browser.close()
        print("Browser closed.")
What's Happening?
-
Error handling: We wrap our code in a try-except block to catch and report any errors that occur during execution.
-
Resource cleanup: The finally block ensures the browser is always closed, even if an error occurs.
-
Closing the session: The close() method shuts down the browser instance we started earlier.
-
Freeing resources: This step ensures no processes are left running in the background.
Step 7: Running the Script
To execute the scraper, we use Python's asyncio to handle the asynchronous operations:
async def main():
    await scrape_ebay_products()

if __name__ == "__main__":
    asyncio.run(main())
What's Happening?
-
Main function: We create a simple main function that calls our scraping function.
-
Async execution: The asyncio.run() method handles the asynchronous execution of our Playwright code.
-
Entry point: The script can be run directly from the command line.
Key Advantages of Scraping eBay with Playwright
This Python and Playwright implementation offers several benefits:
-
Modern automation: Playwright provides excellent support for modern web applications and handles many edge cases automatically.
-
Cross-browser support: While we used Chromium here, Playwright supports Firefox and WebKit as well.
-
Robust error handling: The async/await pattern and built-in error handling make the script more reliable.
-
JavaScript integration: The ability to run JavaScript code directly in the browser context provides powerful data extraction capabilities.
With this approach, you've built a solid foundation for scraping eBay and gathering product data using Python and Playwright. The script efficiently handles the technical complexities of web automation while providing clean, structured data output.
However, as you scale up your scraping operations or encounter challenges like anti-bot detection, pagination, or website structure changes, you might find that managing these complexities becomes increasingly time-consuming. That's where specialized tools and services can be invaluable, as they handle the technical overhead and infrastructure management, allowing you to focus on extracting the data you need without constantly adjusting your scripts for changing website structures or detection mechanisms.
To migrate to a cloud-based fleet of browsers so you can scale seamlessly from your local automation script, take a look at our docs on Connecting to Playwright, which explains how switch from the .launch() method, which opens a browser locally, to the .connect() method which connects to a remote browser on our cloud.
Limitations When Scaling Up
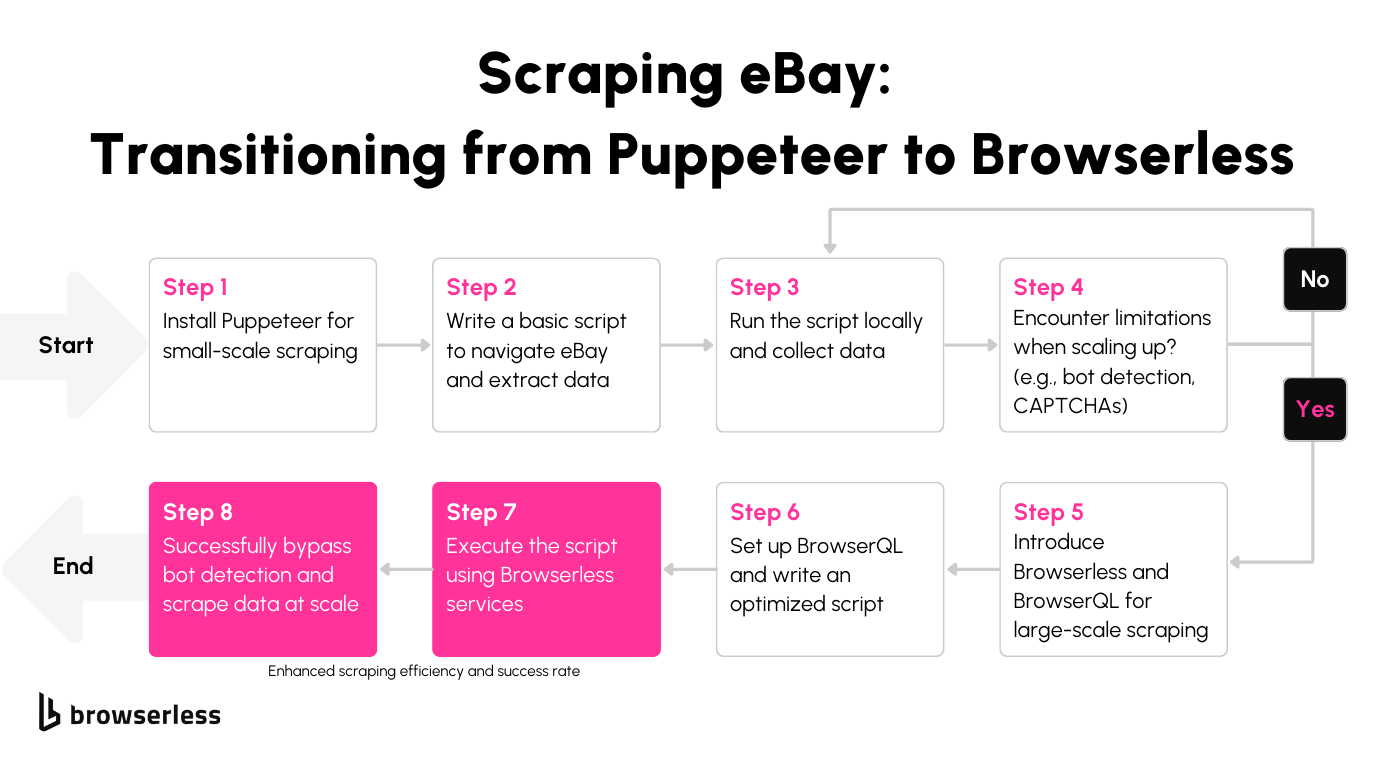
As mentioned for small projects, Puppeteer or Playwright works great. But you'll quickly run into issues if you start scaling up and scraping lots of data. eBay’s anti-bot systems will kick in with CAPTCHAs, fingerprinting, IP bans, and other defenses that make scraping more difficult.
While stealth plugins and proxies can help a little, they aren’t foolproof. You’ll need more advanced tools like BrowserQL for larger projects to keep things running smoothly.
Using BrowserQL for eBay Scraping at Scale
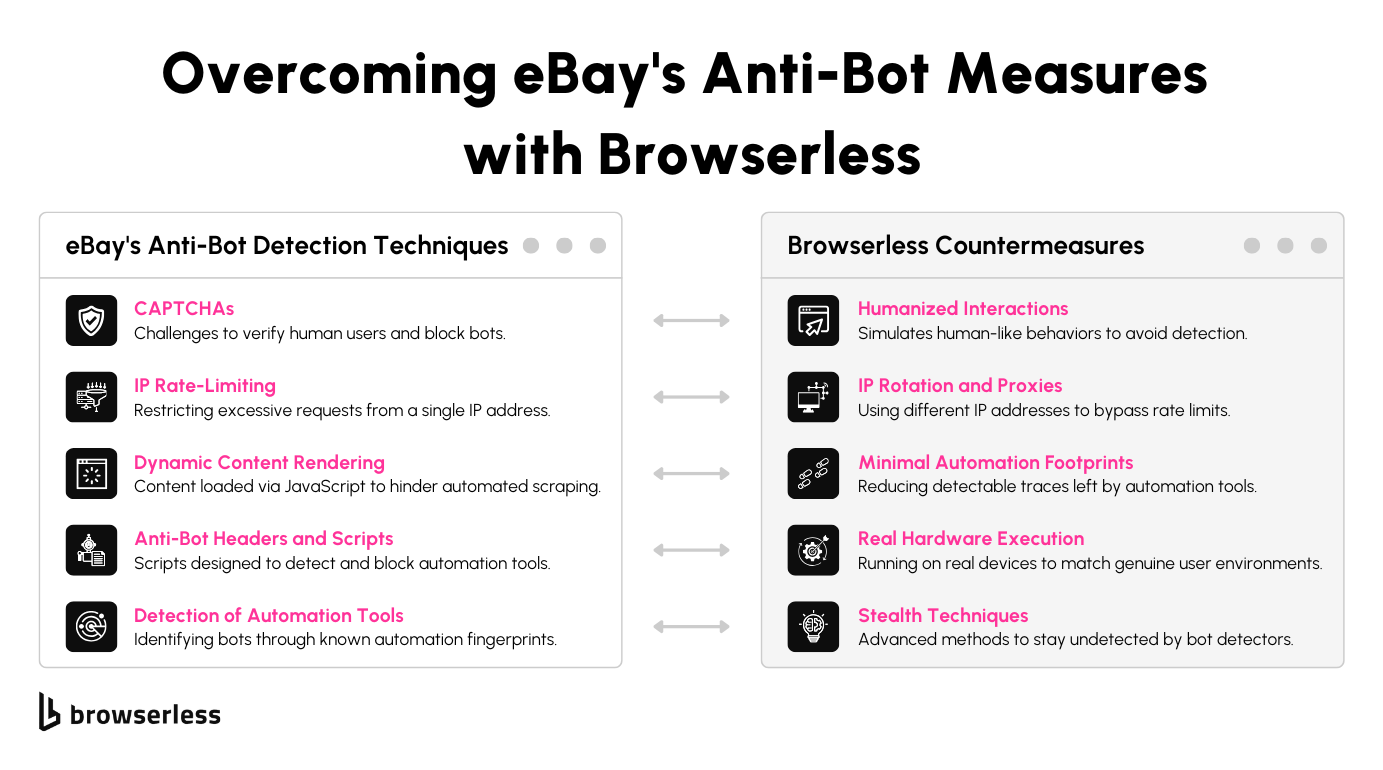
Tools like Puppeteer can quickly hit their limits when scraping data from eBay at scale. BrowserQL was designed to address the challenges of advanced anti-bot systems, making large-scale data collection more efficient and reliable.
eBay's bot-detection
eBay uses sophisticated anti-bot mechanisms to identify automation libraries like Puppeteer or Playwright. These systems detect patterns such as identical browser fingerprints, unnatural browsing behavior, and non-human-like interactions.
They can also monitor headers and scripts often associated with automation tools. Over time, even stealth plugins and proxy rotations can become ineffective, as they leave detectable traces that anti-bot algorithms are designed to identify.
While stealth plugins and rotating proxies can temporarily mask your scraping activity, they struggle to handle eBay’s more advanced detection methods.
Proxies alone can’t replicate the human-like behavior necessary to bypass these systems, and stealth plugins often still leave subtle clues that automation is in use.
As your request volume grows, these techniques become less reliable, leading to increased CAPTCHAs, blocked access, and inconsistent results.
At bowserless, we've developed a tool that won't use the same instancing behaviors as Playwright or Puppeteer, meaning it's a lot easier to fool sites that we're a human. We'll further discuss this on the next section of this blog.
What is BrowserQL?
BrowserQL** **is a GraphQL-based language developed to directly control a browser through the Chrome DevTools Protocol (CDP). Unlike traditional automation libraries, BrowserQL interacts with the browser to minimize the usual behaviors bots exhibit, making it far harder for systems like eBay to detect automation.
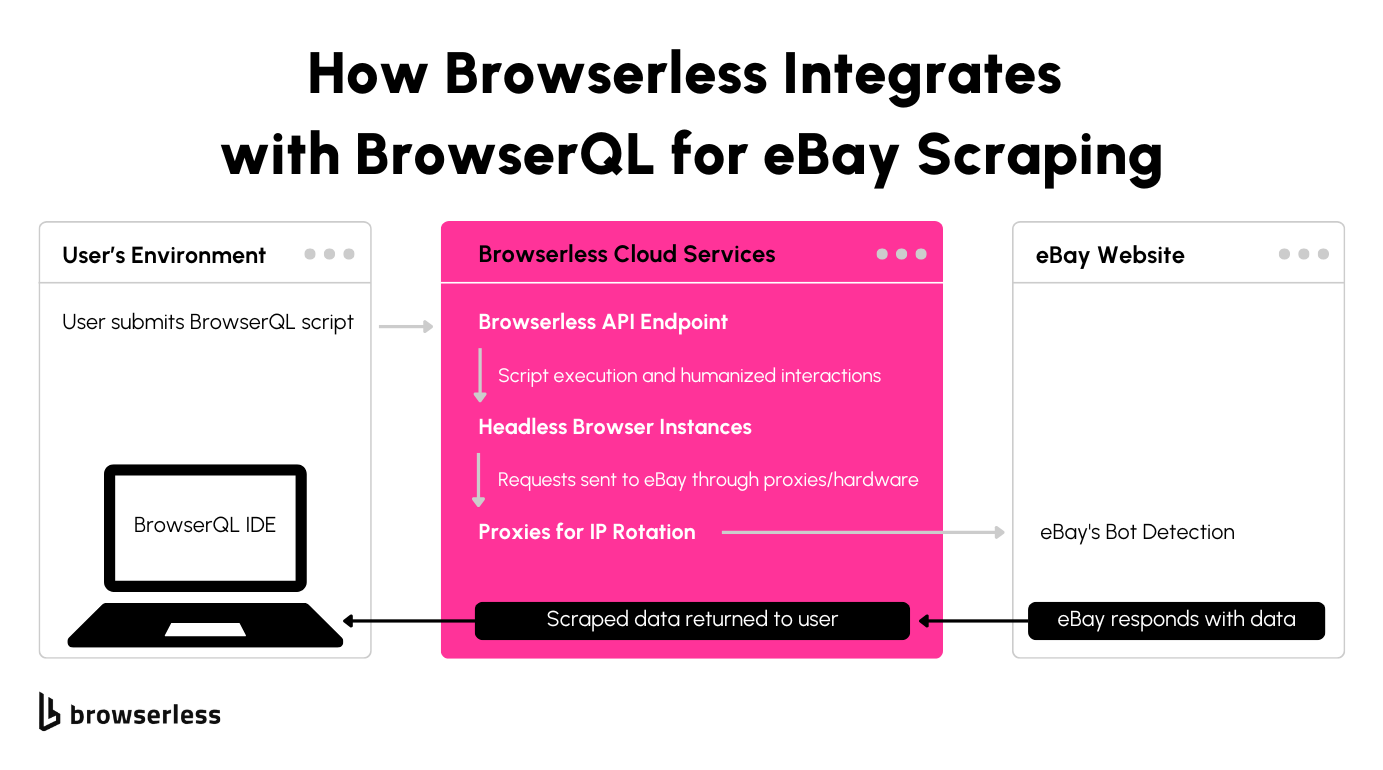
BrowserQL focuses on efficiency and human-like behavior. It reduces interactions to the bare minimum needed for tasks, avoiding actions that might trigger detection.
By default, it includes humanization features like realistic typing, scrolling, and mouse movements, mimicking the behavior of a real user without requiring you to code these details manually.
To get started with BrowserQL, you’ll need to sign up for a free or paid plan, log in and go to the BrowserQL IDE.
The IDE provides a streamlined interface to help you write and test your scraping scripts efficiently. With BrowserQL, you’ll have access to powerful features that make large-scale scraping on eBay far more reliable and effective.
Writing an eBay Web Scraper REST API with BQL
BrowserQL simplifies scraping process, from loading a webpage to extracting specific data. Let’s walk through creating a script to scrape eBay, step by step.
Step 1: Setting Up Your Environment
To begin, let’s get your system ready for the task. You can use BrowserQL with any language via JSON objects, for this example we’ll use a few handy Node.js packages to handle web requests, parse HTML, and save the results. Don’t worry if you’re not familiar with these tools—they make the process much smoother.
Run this command in your terminal to install everything we need:
npm install node-fetch cheerio csv-writer
Here’s a quick breakdown:
node-fetchlets us send requests to the BrowserQL API, which does the heavy lifting of browsing and scraping for us.cheerioacts like a mini web browser, helping us extract useful data from the HTML returned by BrowserQL.csv-writeris how we’ll save the product details into a neat CSV file, which you can open in Excel or any data tool.
Once you’ve installed these, you’re all set to move on to the fun part—writing the script!
Step 2: Configuring the Script
Now let’s set up the script’s foundation. Start by defining the BrowserQL endpoint and your API token, which are like the address and key for accessing the scraping tool.
const BROWSERQL_URL = "https://production-sfo.browserless.io/chromium/bql";
const TOKEN = "YOUR_TOKEN_HERE";
This part is simple but important. The BROWSERQL_URL points to the BrowserQL service, and the TOKEN authenticates your requests so the service knows it’s you. Make sure to replace YOUR_TOKEN_HERE with your actual token, which you can find in your BrowserQL account. Without it, you won’t get very far!
Step 3: Writing the BrowserQL Mutation
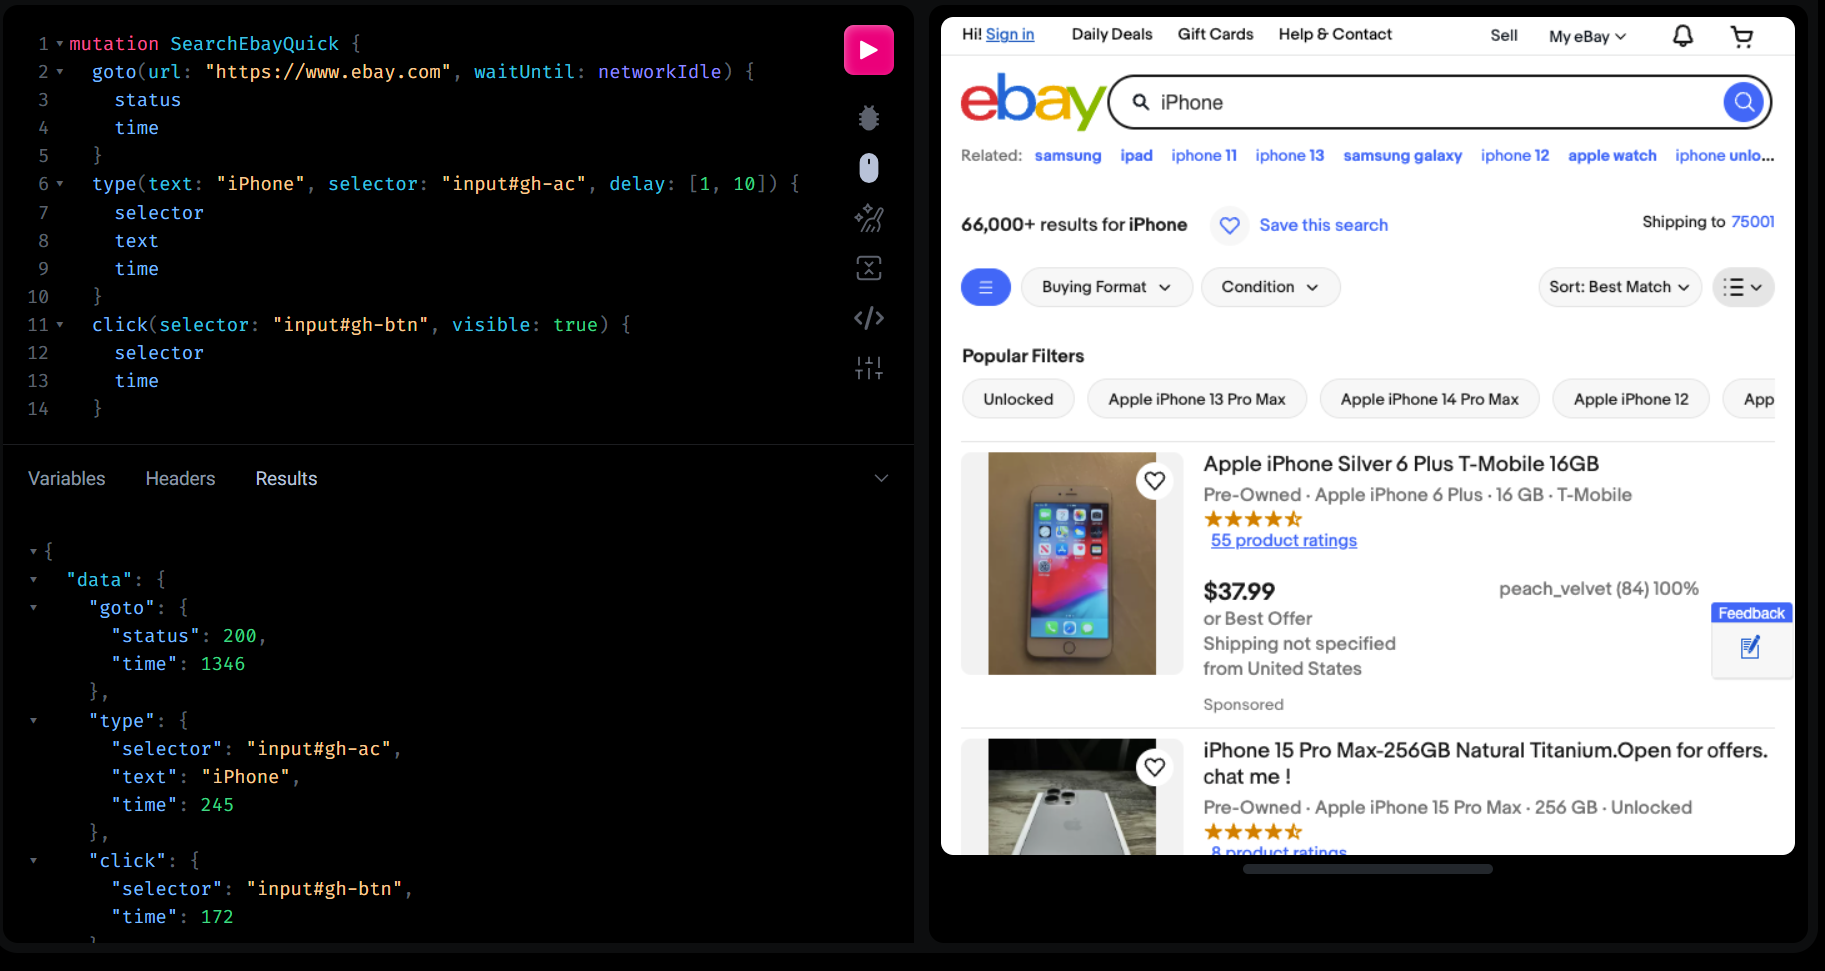
Here’s where we tell BrowserQL exactly what to do. This mutation is like a recipe for the scraping process, with clear steps for loading the page, typing a search term, clicking the search button, and collecting the results.
const query = `
mutation SearchEbayQuick {
  goto(url: "https://www.ebay.com", waitUntil: networkIdle) {
    status
    time
  }
  type(
    text: "iPhone",
    selector: "input#gh-ac",
    delay: [1, 10]
  ) {
    selector
    text
    time
  }
  click(
    selector: "#gh-search-btn",
    visible: true
  ) {
    selector
    time
  }
  waitForSelector(
    selector: "ul.srp-results",
    timeout: 10000
  ) {
    time
    selector
  }
  htmlContent: html(visible: false) {
    html
  }
}`;
goto: This step opens eBay’s homepage and waits for the network to settle. It ensures we’re working with a fully loaded page.type: The search term ("iPhone") is typed into the input field using a CSS selector (input#gh-ac). The small delay between keystrokes mimics human behavior, which helps avoid detection.click: This clicks the search button, triggering eBay to display results. The visible: true condition ensures the button is clickable when the script tries to interact with it.waitForSelector: This waits for the search results to appear, using a specific selector to target the results container. It ensures we don’t try to extract data before it’s ready.html: Finally, the entire HTML of the results page is extracted for parsing.
This straightforward sequence focuses on one thing at a time, so you can debug easily if something goes wrong.
You can run the query within the BrowserQL editor to watch it run and debug any issues.
Step 4: Sending the Request
Let’s send our query to BrowserQL and grab the response. This is where we connect to the service and retrieve the page HTML.
const response = await fetch(`${BROWSERQL_URL}?token=${TOKEN}`, {
  method: "POST",
  headers: {
    "Content-Type": "application/json",
  },
  body: JSON.stringify({
    query,
  }),
});
const data = await response.json();
const html = data.data.htmlContent.html;
fetchsends the mutation to BrowserQL’s endpoint. It’s a POST request with the query as the payload.- **
response**contains BrowserQL’s reply. If everything went well, this will include the HTML of the eBay results page. data.data.htmlContent.htmlextracts the raw HTML from the response.
This part is where BrowserQL works its magic behind the scenes. It’s like having a headless browser run the tasks for you and return the results, saving you from the complexity of browser automation libraries.
Step 5: Parsing the HTML
With the HTML in hand, it’s time to dive into the data. We’ll use Cheerio to extract product details like the name, price, and ratings.
import cheerio from "cheerio";
const $ = cheerio.load(html);

const products = [];
$("li.s-item").each((index, element) => {
  const title = $(element).find(".s-item__title").text().trim();
  const price = $(element).find(".s-item__price").text().trim();
  const ratings = $(element)
    .find(".s-item__reviews-count span")
    .first()
    .text()
    .trim();

  products.push({ title, price, ratings });
});
cheerio.loadturns the HTML into a structure we can easily navigate.$("li.s-item")targets each product container in the results.- Inside the loop:some text
find(".s-item__title")grabs the product name.find(".s-item__price")retrieves the price.find(".s-item__reviews-count span")pulls the number of ratings. find(".s-item__title")grabs the product name.find(".s-item__price")retrieves the price.find(".s-item__reviews-count span")pulls the number of ratings.- Each product’s details are saved in an array of objects called
products.
By now, we’ve transformed a massive block of HTML into structured data you can actually use.
Step 6: Saving to a CSV
Finally, let’s save the extracted data into a CSV file. This makes it easy to view the results in a spreadsheet or share them with others.
import { createObjectCsvWriter } from "csv-writer";

const csvWriter = createObjectCsvWriter({
  path: "ebay_products.csv",
  header: [
    { id: "title", title: "Product Name" },
    { id: "price", title: "Price" },
    { id: "ratings", title: "Ratings" },
  ],
});

await csvWriter.writeRecords(products);
console.log("Data saved to ebay_products.csv");
createObjectCsvWritersets up the file’s path and column headers.writeRecords(products)writes the array of products to the CSV file.- A message confirms the file was saved successfully.
Now you have all the scraped data neatly organized in a file you can open or analyze further.
Conclusion
Scraping eBay at scale comes with challenges, but tools like Browserless make it manageable and efficient. While Puppeteer is great for small projects, scaling up requires the advanced features and anti-bot capabilities of BrowserQL. From handling complex detection systems to providing human-like interactions, BrowserQL streamlines the entire process. If you’re ready to take your scraping projects to the next level, give BrowserQL a try today.
FAQ Section
**Is it legal to scrape data from eBay? **Scraping public data is generally okay, but it’s always a good idea to check eBay’s terms of service to understand their rules around automation. To be safe, talk to a legal expert who can guide you based on your specific project and location.
**Can I use Puppeteer or Playwright for scraping eBay? **Puppeteer works well for smaller projects, and it’s a good place to start if you’re just getting into scraping. But if you’re planning to scrape more data or scale up, you’ll likely run into issues with eBay’s CAPTCHAs, IP blocks, and other anti-bot measures.
**How does BrowserQL differ from Puppeteer and Playwright? **BrowserQL is built specifically to handle modern bot detection. It avoids the typical fingerprints that tools like Puppeteer leave behind and includes built-in features like human-like typing, scrolling, and clicking. It’s perfect for large-scale scraping where you need to stay under the radar.
**What if BrowserQL doesn’t bypass eBay’s bot detection? **If you run into any issues, Browserless we have a support team ready to help. They stay on top of the latest detection methods and can assist in finding a solution to get your scripts running smoothly.
**How do I get started with BrowserQL? **It’s easy to get started! Just head to the Browserless website, sign up for a free trial, and download the BrowserQL IDE from your account page. Once you’ve got it, you’ll be ready to build and test your scripts in no time.