Just a heads-up: This article is no longer current! We’re always improving – check our website for the most up-to-date details.
One of the largest video sharing and social media platforms, YouTube, has successfully become a part of our everyday lifestyle and has exploded into an entire industry. The platform houses a plethora of different content and materials. We constantly see new channels looking to entertain, discuss, inform, promote and capitalize on the shift of the audience to modernized information mediums.
To succeed in this competitive environment, a YouTube creator must understand their niche, audience, and relevant information accompanying each video to decide the best way to stand out. However, with all the content out there this would take hours upon hours of documenting and categorizing each relevant statistic.

Fortunately for us, there is a way to automate the process of scraping YouTube videos. In this article, we’re going to find out how easy it is to use web-scraping techniques with a free service like Browserless and the fantastic Puppeteer library to gather all the relevant statistics of a list of YouTube videos.
Let's check out how to scrape data from YouTube:
YouTube scraper step #1 - Register for a free Browserless account to start scraping YouTube videos
Browserless is a headless automation web service that provides fast, scalable, and reliable web browser automation, ideal for data collection tasks. It’s an open source platform with more than 8K stars on GitHub and works with some of the biggest companies worldwide.
To get started, we first have to create an account.
The platform offers free and paid plans if you need more powerful processing power. We will select the Free Plan, which is more than enough for our case.
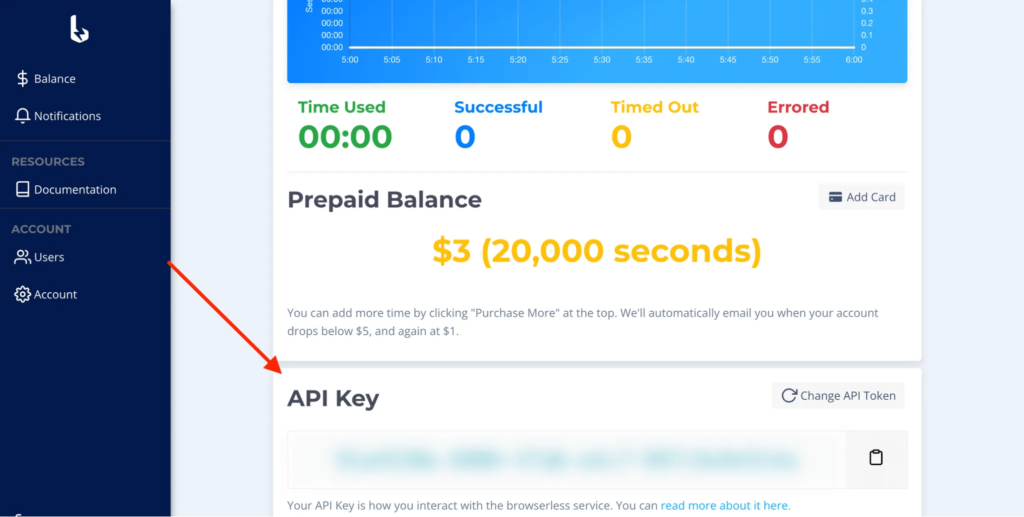
After completing the registration process, the platform supplies us with an API key. We will use this key to access the Browserless services later on.

YouTube scraper step #2 - Set up a basic Node script
Our next step is to set up a simple Node project and use the Puppeteer library to scrape the desired YouTube content. While the Browserless service works with many great tools and environments like Python, Java, Go, C#, Ruby, and Node, we’re leveraging the simplicity of JavaScript for this example.
First, let's initialize a new Node project and install the Puppeteer package.
$ npm init -y && npm i puppeteer-core
Puppeteer is a popular JavaScript library used for web-scraping tasks. It counts more than 78K stars on GitHub and is actively maintained. The puppeteer-core package provides all the functionalities of the main puppeteer package without downloading the browser, resulting in reduced dependency artifacts. Our next step is to instantiate a browser instance.
Let's walk through the above script real quick:
- We need to import the
puppeteer-corepackage - We declare the variable
BROWSERLESS_API_KEYto store the API key. - We create an asynchronous function
getYoutubeVideoStatisticsthat accepts the video URL and returns an object whose keys represent different statistics. Currently, we return an empty object because we did not yet access the relevant DOM elements. - We create an Immediately Invoked Function Expression (IIFE) that calls
getYoutubeVideoStatisticsand prints its statistics to the terminal. This function will be the first to run upon executing our script.
The critical part to notice here is the way we connect to the Browserless service. We call the connect method on the Puppeteer instance, which allows us to connect to a remote browser, and use the browserWSEndpoint property to indicate the connection URI, which consists of three parts:
- The base URI
wss://chrome.browserless.io - The
tokenquery-string parameter, which value is the API key we retrieved from the dashboard. - The
stealthquery parameter ensures our requests run stealthfully. This comes in handy if third-party security services like Cloudflare block the website we try to reach.
> You can learn more about all the available query parameters on the official docs.
YouTube scraper step #3 - Locate the appropriate selectors
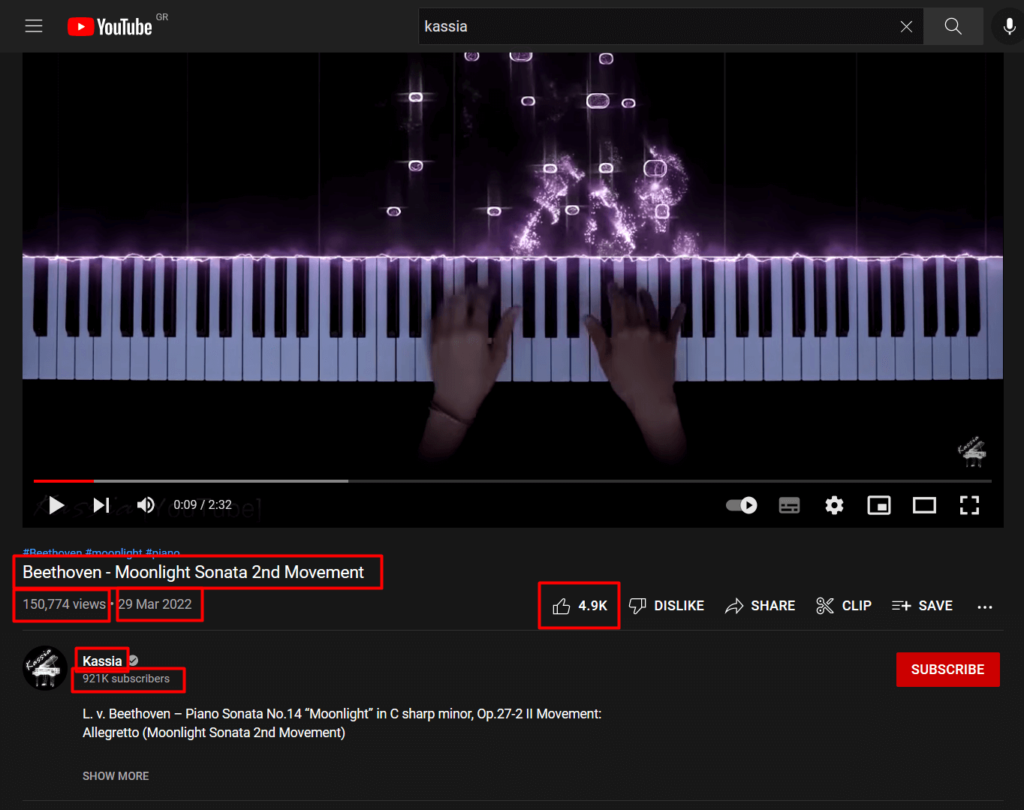
Now that we have a base structure for conducting our scraping, we have to identify the desired video metrics we want to track and their corresponding DOM elements, then build the appropriate selectors to get the desired values. At the time of this writing, YouTube’s interface looks similar to the following screenshot:

At a bare minimum, each video consists of the following details (marked by a red box):
- A title
- The number of views
- The upload date
- The number of likes
- The channel name
- The number of subscribers
To successfully retrieve that information from our script, we first need to build the appropriate query string. To keep this article short, we have already prepared the appropriate selectors. Here is the one for accessing the title:
h1 > yt-formatted-string[class="style-scope ytd-video-primary-info-renderer"]
To complete this section, we must retrieve our selector's value within the scraping script. We will call the $ method on the page object to get an element handle and then access the corresponding text values by using the evaluate method.
We also update the return value of getYoutubeVideoStatistics, to include the title property, and do the same for all the other selectors we identified. Here is the final scraping script.
Executing the script
Running the above script, we should get the following output.
Note: YouTube interface is updated every few months, making the above selectors obsolete. You might need to relocate the corresponding elements on your page. However, the base structure of the script should still serve you well even after those changes.
Epilogue
In this article, we saw how to leverage the Browserless and Node platforms to conduct data retrieval of YouTube videos through web-scraping. We hope we taught something interesting today so you can improve your workflow. You can also tweak the code for your needs, such as running a YouTube comment scraper, etc. Stay tuned for more educational articles.
If you like our content, you can check out how our clients use Browserless for different use cases:
- How @IrishEnergyBot used web scraping to help create awareness around Green Energy
- How Dropdeck automated slide deck exporting to PDF and generation of PNG thumbnails
- How BigBlueButton, an open-source project, runs automated E2E tests with Browserless
__
George Gkasdrogkas,
